Connect a Raspberry Pi to a Laptop that uses WICD for WiFi management with a Persistent Peer to Peer Wired Ethernet Connection and Connect Both to the Internet Simultaneously Without Blowing your brains out.....
This article assumes:
The two computers are connected with a crossover cable or at least one of the adapters are CrossOver aware. (see: Do you need a crossover cable?http://www.networkworld.com/article/2219416/lan-wan/do-you-need-a-crossover-cable-.html)
Both the Raspberry Pi and the Laptop are connected to the internet and each other with a WiFi connection and the Pi is accessible with ssh..
The Laptop uses Wicd to manage Wifi connections....
Note: If at least one of the two cards supports Auto-MDIX, then the cross-over function will be taken care of automatically.
Your Pi should be Auto-MDIX.
Background
I recently purchased a Raspberry Pi and a WiFi dongle to connect to my WiFi router. I also have a WiFi connection on my laptop. However, the limitations of this type of connection became apparent when using NFS and trying to access my rtl dongle with a tcp connection. The wireless was just too slow.
It is usually simple enough in a case such as this to simply add a peer to peer wired link to share such services. However, I ran into problems because I use WICD to manage my WiFi connection on my Laptop. WICD is not scheduled to manage two connections simultaneously until version 2. Not having much luck using Network Manager with my Atheros wireless card I was a bit leery of ditching WICD for Network Manager. So I decided to figure out how to use the connection scripts in WICD to make my wired connection persistent. The main advantage of this method is my wired connection to the Pi is only attempted if I am at home. Since the connection scripts are per connection if I connect to another WiFi hotspot the wireless adapter will never attempt to connect to the Pi or attempt to mount my NFS shares. In short, the secret to making this all work was to blank out the entry for the wired connection in WICD and just manage the connection with ifconfig in the script.
Topography
Here is a Network Diagram showing the layout of our Network:

Step 1:
Connect manually to see if it works:
On Pi:
ifconfig eth0 10.10.0.11 netmask 255.255.255.0 broadcast 10.10.0.255
On laptop:
ifconfig eth0 10.10.0.10 netmask 255.255.255.0 broadcast 10.10.0.255
now:
ping 10.10.0.11
from latop to test
then:
ping 10.10.0.10
from pi to test
Use mii-tool to diagnose connection problems:
mii-tool eth0
And look for this in output:
eth0: negotiated 100baseTx-FD flow-control, link ok
The “link ok” is the important part. This means that your cables have a connection on the link layer.
try:
mii-tool eth0 -r
to fix problems. This command resets the link layer connection.
Depending on your distro, you wired connection may not be eth0. Use ifconfig with no switches from the command line to determine the name of your wired interface.
You will need to install mii-tool from your distro's package manager to use it. Refer to your distro's package manager documentation.
Step 2:
Make the connections persistent.
Setup the Pi:
Copy netctl static profile
cp /etc/netctl/examples/ethernet-static /etc/netctl/static
Then edit
nano /etc/netctl/static
To edit ip setting:
Address=('10.10.0.11/24')
add line:
SkipNoCarrier=yes
NOTE: the 'SkipNoCarrier' line should come before the 'Address' line.
NOTE: the 'SkipNoCarrier' line should come before the 'Address' line.
The line above will make sure your Pi assigns an IP address to the interface regardless of whether the cable is connected or not.
make sure ifplugd is disabled with systemctl
systemctl disable ifplugd
Enable and start your new profile:
netctl enable static
netctl start static
Alternate method (probably better)
If you use this method do not create a netctl service for the interface. If you already have a netctl service for this interface, disable it with netctl.
nano eth0.network
Edit file to look like:
[Match]
Name=eth0
[Network]
#DHCP=both
Address=10.10.0.11/24
[Addreess]
Address=10.10.0.11/24
Peer=10.10.0.10/24
Broadcast=10.10.0.255/24
NOTE: Don't add an address line in the netctl profile if you have set an address here.
Setup Laptop
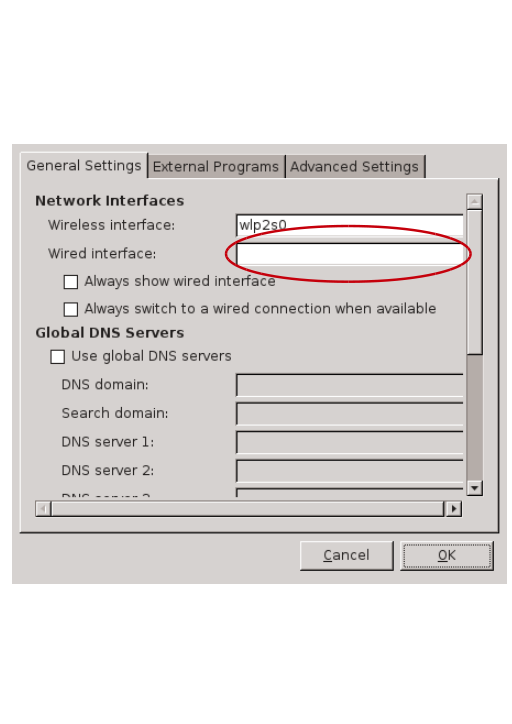
Open wicd tray icon
Preferences → General Settings → wired interface: blank
Add post connect script:
nano /etc/wicd/scripts/postconnect/start-wire
Now add these lines to the script:
# /bin/bash
ifconfig eth0 10.10.0.10 netmask 255.255.255.0 broadcast 10.10.0.255
# wait
# mount /mnt/<nfs-share>
Reboot to test.
You may need to add a static ip address for your interface to avoid DHCP errors on boot if you use OpenRC on your laptop.
nano /etc/conf.d/net
Add the line:
config_eth0="10.10.0.10 netmask 255.255.255.0 broadcast 10.10.0.255"
Now you should have a static wired connection between your laptop and Pi. Next article will be on setting up an avahi server on the Pi for local network name resolution.
No comments:
Post a Comment